Keypad Control for non WiFi Capable controllers.
Press any key to activate the keypad. If you don't receive a response, they keypad is locked out (see below).
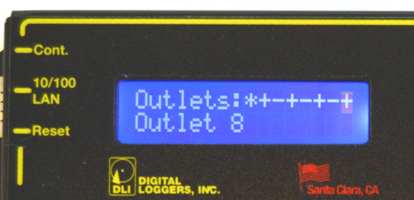
Outlet (port or relay) status shows on the first line. The outlet name or time/date of last modification shows on the second line. Three symbols are used for relay status + (ON), - (OFF), and * (LOCKED). In this example, the relay 1 is locked ON, the even numbered relays are ON, and relays 3.5.7 are OFF. The flashing cursor indicates outlet 8 is selected:
Select an outlet by pressing 'UP' (next) or 'DOWN' (previous). Hold 'UP' or 'DOWN' to advance automatically. Select an outlet, then:
- Turn the selected outlet ON by pressing '1'.
- Turn the selected outlet OFF by pressing '0'.
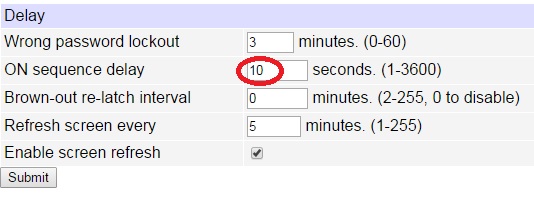
- Cycle selected outlet OFF-then back-ON by pressing 'CYCLE'. The OFF time for a power cycle (ie. 10s OFF before turning ON) is set here on the setup page:
Locking Outlets
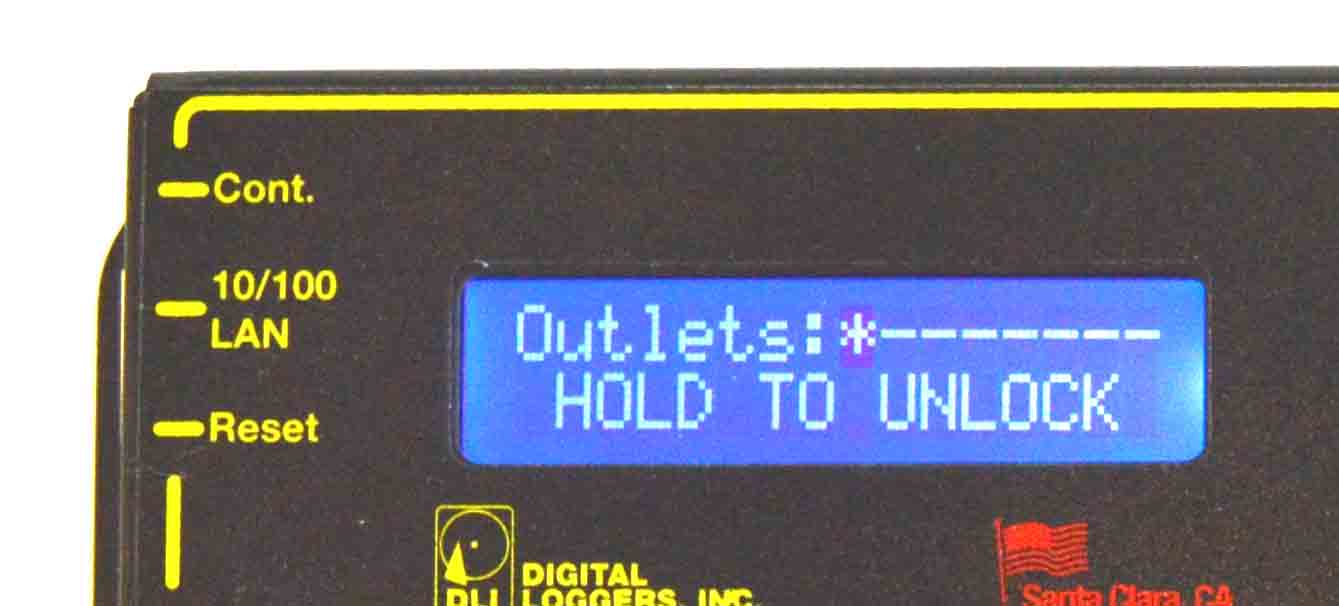
Holding ON or OFF down for a few seconds has a locking effect. For example, if an outlet is currently in the ON state, it can be locked in this state by long-pressing '1'. A star appears, ie:
Press '0' and hold for a few seconds to unlock. Similarly, if the outlet is currently in the OFF state it can be locked by holding '0' and unlocked by holding '1'.
Network Setup Menu - Added in firmware versions 1.8+
Although the web interface is more commonly used, the keypad is helpful for initial setup and for minor changes. To enter network setup, press 'UP' and 'DOWN' simultaneously.
Hint: Try holding the down button, press the up button, then relase both.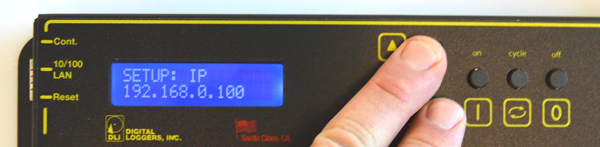
Network setup consists of several pages. Use the 'CYCLE' key to loop
through them.
- 'UP' and 'DOWN' are used to select a field within the page.
- Pressing '1' means "yes" or "add 1"
- Pressing '0' means "no" or "subtract 1"
Available settings are:
IP address (default 192.168.0.100)
Netmask (default 255.255.255.0)
Gateway (default 192.168.0.1)
Syslog server (default 0.0.0.0 = disabled)
IP addresses are comprised of four octets per page. Select an octet with 'UP' (next) or 'DOWN' (previous). Press '1' to increment the octet, or '0' to decrement.
HTTP Port
Press '1' to increment the port, or '0' - to decrement.
Same Subnet Restriction
Press '1' to activate restriction, '0' - to deactivate. When activated, only devices in the same class-C can access the switch. Note: whitelists can only be edited from the web UI.
Web configuration protection
Network settings are locked on the web setup page when protection os enabled. Press '1' to activate protection, '0' - to deactivate. You will need physical access to the switch to unlock.
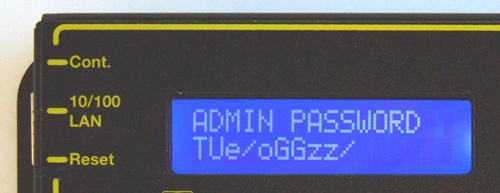
Password for admin user
Press '0' to leave the password unchanged. Press '1' to assign a new random case-sensitive password.
Save/Discard
Exits setup. Press '0' to discard all changes, or '1' to save. Review your selections using 'CYCLE' to correct errors before saving.
Keypad and Web UI Lockouts
The local keypad can be disabled by the admin from the Web interface here on the SETUP page:
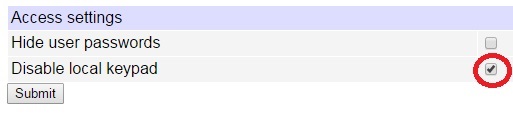
If this is done, only the web UI or the reset-to-defaults button below will re-enable the keypad.
Conversely, the web configuration UI can be disabled here:
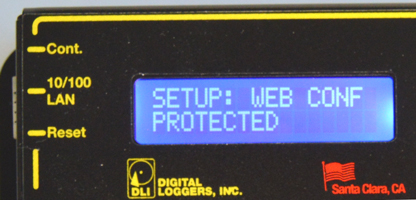
To re-enable web configuration, use the keypad.
Reset-to-Defaults
Press the reset button gently will reset to defaults IPs above, set the login to admin/1234, and disable scripting:
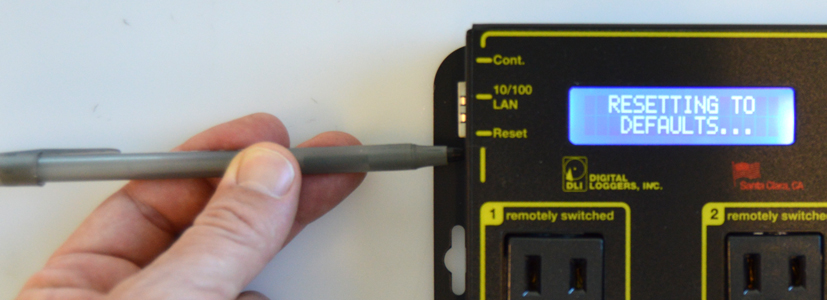
Most other settings including outlet names remain unchanged. Please be gentle. Mashing it with a screwdriver could damage it.
Feedback. Suggestions? Email
engineering@digital-loggers.com