Auto-PingTM
Using AutoPing
To use Auto-Ping, first add an IP address. Next, link that IP
address to one or more outlets. Timing settings should be considered.
Adding an IP Address to Auto-Ping
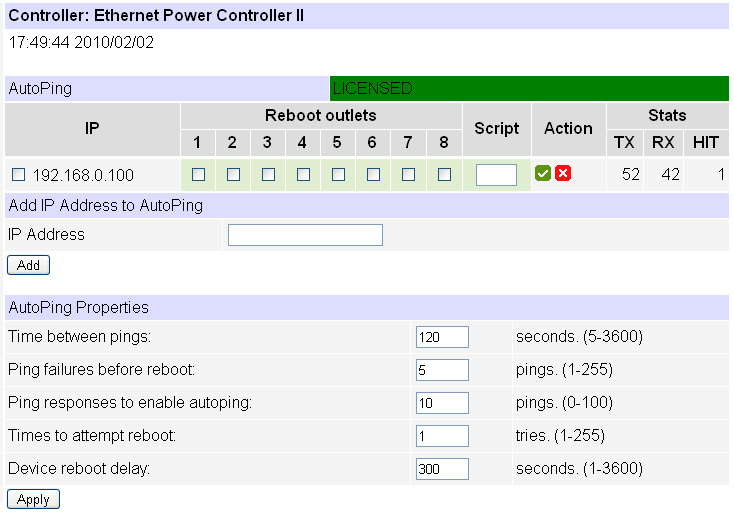
After entering the IP address, the settings page will refresh and you can select the outlets associated with this address. Use the checkboxes in the Auto-Ping section to correlate the IP address to one or more outlets. If communications to the IP address is lost, these outlets will be rebooted. Four timing settings control Auto-Ping operation:Time between pings
This is the time between each "ping" check of the IP address. The power switch waits this amount of time for a valid ICMP response. 60 seconds should be useful for most applications.Ping failures before reboot
This sets the number of failed communications attempts that must be sequentially detected before a system is rebooted. For example, when set to 5, the target system must fail to respond 5 times in a row before it is rebooted. Since occasional network overloads and missed packets can occur during normal network operation, a number between 5 and 10 pings is recommended.Times to Attempt Reboot
If you have an unreliable target device, limit the number of times it will be rebooted by entering that value here. For example, entering 5 will reboot your server up to 5 times before giving up.Device Reboot Delay
After rebooting a device with a cold-boot power-off, a waiting period should occur before the IP address is re-checked by AutoPing. This delay allows the device to reboot. Windows and Linux servers can force automatic file system checks which may take several minutes to complete. Enter a safe value To allow for this, enter a time delay in the Device Reboot Delay period. For example, a reasonable value for a typical Windows server might be 10 minutes (600 seconds). Entering 600 would cause the power controller to start checking the server for normal operation 10 minutes after reboot.Starting Auto-Ping
After checking the timing settings for safety, first check the box to the left of the IP address. Next click the
Stopping Auto-PingTM
To stop Auto-Ping operation, uncheck the checkbox to the left of the IP address and click theAdding a Second IP (Joining)
You can also add a secondary IP address to Auto-Ping. For example, you might want to monitor two Internet servers. If both servers are inaccessible, you may want to restart a router. Enter the first IP address, but leave all checkboxes and the script box blank. After entering the second IP address, aStarting a Script from Auto-Ping
Auto-Ping can trigger execution of a user-defined script. Enter the line number of the script to the right of the IP address. This is handy where you need to bring equipment up in sequence after a restart. For example, you might want to start a router first, then a file server.Starting Auto-Ping on Power-Up
You can use a user-defined script. to start Autoping. For example:
1 AUTOPING N
2 SLEEP 3600
3 GOTO 1
will start autoping on power-up (line 1 starts on power-up), then re-enable autoping every hour. The requirement for 10 successful sequential pings before startup applies.
Stats
The statistics box reports the number of pings transmitted, received, and ping "hits".Like to learn about our Power Controllers?
Take a peek at our redundant rack-mount controllers. DLI also builds vertical PDU strips, Ethernet controlled DIN relays and a very cost-effective desktop power switch.Order Today - Risk Free
Your power controller is ready for overnight shipment. Call (408) 330-5599 for a 15-day risk-free evaluation. Auto-PingTM is a trademark of Digital-Loggers, Inc.